
This article is primarily a tutorial for new FlowLink clients, but also illustrates some of the basic functions of FlowLink for those of you who may be considering using FlowLink to automate your eCommerce back office.
A Notification is FlowLink notifying you of a possible issue. Usually this can stem from your store, accounting system, or other software going down for a few minutes, changing login credentials (so you will need to update them in your FlowLink account), and sometimes mapping issues (you may have started using Stripe, but haven’t put Stripe in as a payment method in QuickBooks yet).
Mostly these notifications are simply small changes that can happen over time with the various software with which the FlowLink platform is integrated. It usually isn’t a software bug, but a configuration change within the platforms with which we integrate.
To see if there are any unresolved notifications that may have occurred in your workflows, simply log in and locate the bell icon on the top right of the screen. If there are any unresolved notifications, you will see a red circle with the number of errors displayed on the bell.

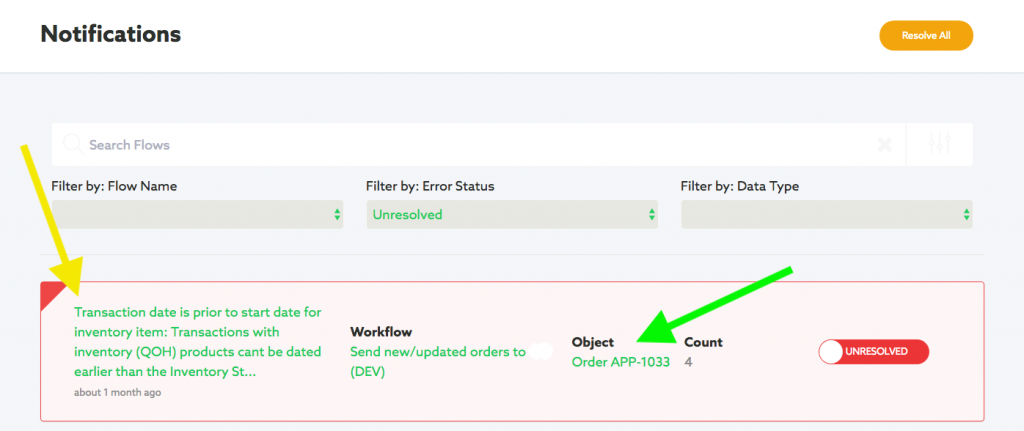
Clicking on the bell will bring you to the notifications page. The description of the notification will be displayed as the first item in the row, while the ID of the data object (Order, Product, Inventory, etc) will be the third item in the row.
Yellow Arrow -> Description Green Arrow -> Object ID
Note: FlowLink will attempt to send data objects more than once in case of a down API (connection) or another temporary setback which would cause a notification.
Resending a Data Object
 Reminder: A data object is a generic term we use for Orders, Products, Inventory, or any other bundle of information FlowLink syncs between platforms.
If a notification occurs when sending an object to your software, please follow the steps in the “Finding the Notifications Screen” section to locate the notification. Pay special attention to the Object ID.
Once you have located the object ID and have confirmed that the syncing issue has been handled (see section below on common Notifications and steps to resolve them), you’re ready to attempt to resend that object.
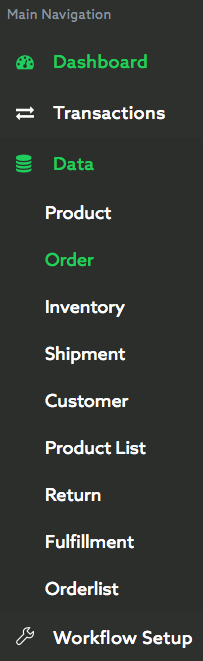
Using the navigation bar on the left-hand side of the page, click Data. This will open an expanded submenu listing all of the possible Data Objects available in FlowLink (See Graphic to the left). Select the object type where the object you would like to resend would be located.
Clicking on an object type will bring up the complete list of your company’s data objects of that type. To easily find a specific object, enter the object ID to filter the object list.
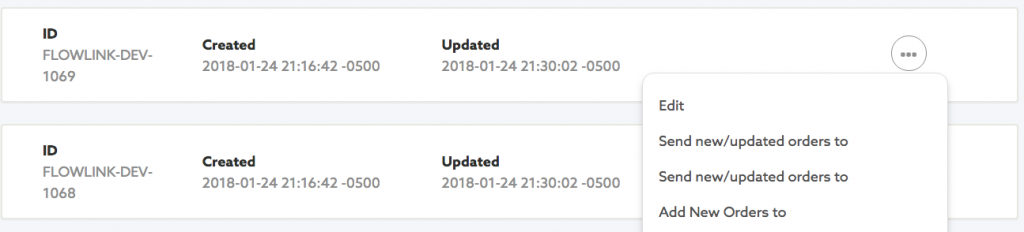
When you have found the object you would like to resend, click the button with the ellipsis (set of dots) to bring up possible actions (See Graphic below). Select the correct workflow to resend your object.
Running an Automated Workflow Manually
In FlowLink, any workflows that retrieve objects are run on an automated 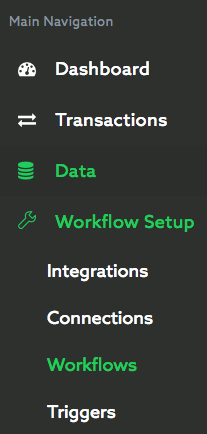 schedule depending on your specifications. We like to call these workflows GET workflows as they GET objects. Alternatively, when FlowLink adds/updates data objects to another system, we call these workflows SEND workflows.
In the section above (Resending a Data Object) we detailed how to manually run a SEND workflow. Here we will describe how to manually run a GET workflow.
To find a list of your possible workflows, select Workflow Setup from the left hand menu. This will open another expanded submenu. Select Workflows. (See Graphic on the left).
This will take you to the Workflows page. Here, you will see a list of all workflows your company has. Running a SEND workflows from here is easy. Just select the ellipsis button and choose Run Flow. (See Graphic Below)
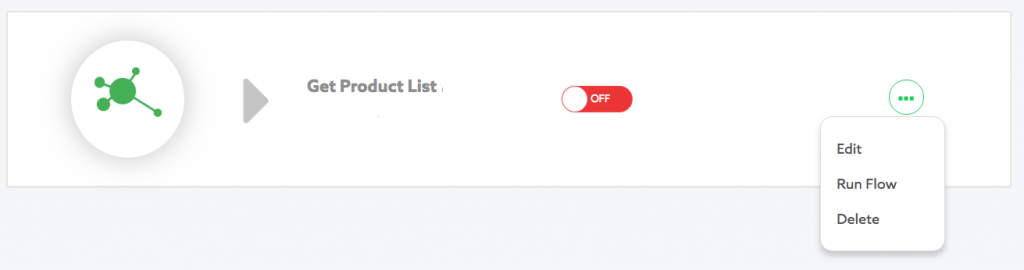
Note: Selecting Run Flow will run the workflow even if the workflow is turned off. The On/Off toggle refers to if the workflow is running on an automated schedule or not. If you only want to run the workflow once without having it on an automated schedule, you can do so without toggling the workflow On.
Common Notifications and Steps to Resolve Them
Note: Lots of data objects are used for examples of the notifications below. If you have a notification that looks similar to one below, but with one or two words being different, it’s probable that the notification is the same.
Notification: Transaction date is prior to starting date for inventory item: Transactions with inventory (QOH) products can’t be dated earlier than the Inventory Start Date for the product
Fix: The date this Order was placed on is earlier than the Inventory start date for one of the line items. QuickBooks needs each line item’s Inventory start date to be prior to an Order being placed. Update the Inventory start date to earlier than the Order date for all of the line items, then resend the order.
Notification: Error: SKU cannot be empty
Fix: One of the Line Items does not have a SKU associated with it. This normally happens when custom items are created in an eCommerce store on the fly. These items are “one-time-use” items in the eCommerce store and therefore are not provided a SKU. Contact [email protected] to discuss solutions for this issue.
Advanced Fix: You can manually add a Product in your QB account for this item and then add the newly created Product’s SKU to the line item’s SKU field by editing the data object in FL.
Notification: Can’t find the key ‘Visa’ in the provided mapping
Fix: This is a payment method mapping issue. Please contact [email protected] to quickly update your payment method mappings for this workflow.
Notification: Order S-1088 already has a sales receipt with id: 586
Fix: This error occurs when there already is an existing Sales Receipt within QuickBooks. It’s possible that the SEND orders to QuickBooks workflow actually succeeded when it attempted to add the Order. Please check the Sales Receipt to ensure it’s accurate. If it is not, contact [email protected] for assistance.
Notification: A business validation error has occurred while processing your request: Business Validation Error: When you create an item, if Track quantity on hand is turned off, the item cannot be of type Inventory.
Fix: QuickBooks automatically assumes you are tracking inventory for the line items in an Order. Ensure that each of that Order’s Products has ‘Track Quantity on Hand’ turned on in QuickBooks, then resend the Order. Alternatively, if you do not want to track inventory for your items, contact [email protected] to update your integration parameters.
Notification: Inventory Item “32246” not found in NetSuite
Fix: Flowlink is attempting to add a line item from an Order. In almost all integrations, FlowLink will search for the item and then associate the existing item with the newly created Order. FlowLink will NOT attempt to create the item. This ensures FlowLink will not cause unwanted inventory and accounting errors. If you would like to turn automatic product creation, please contact [email protected].

Comments